Tuesday, October 26, 2010

OCTOBER DARING BAKERS CHALLENGE: Let's Go Nuts for Doughnuts!

The October 2010 Daring Bakers challenge was hosted by Lori of Butter Me Up. Lori chose to challenge DBers to make doughnuts. She used several sources for her recipes including Alton Brown, Nancy Silverton, Kate Neumann and Epicurious.

I will only be providing the Alton Brown ones since that's the only one I've tried (so far). They are soooooo wet, I mean the dough prior to fry, making it almost impossible to handle keeping it's shape after you cut them. So be ware!


Equipment required:
  • A Dutch oven or deep skillet (I prefer using a Dutch oven to reduce splatter)
  • Deep fry thermometer, candy thermometer or any thermometer that will withstand and measure temperatures of up to 380 degrees
  • Metal slotted spoon, metal slotted spatula or tongs (do NOT use plastic - it will melt!)
  • Cookie sheets or a wire rack lined with paper towels to allow doughnuts to drain
  • Electric hand mixer or stand mixer, or a bowl and a spoon if you are able to utilize a lot of elbow grease
  • Doughnut or biscuit cutters or you can use a glass and a piping tip for the center
  • Pastry bag (if you choose to make Bomboloni or any filled doughnut) or a squeeze bottle with a good tip that will poke a hole in your Bomboloni. Another way to fill a doughnut is to use the tip of a sharp knife to poke a hole in the doughnut and then use a ziplock bag filled with filling and cut on one corner to fill the doughnut.
Yeast Doughnuts:
Preparation time:
Hands on prep time - 25 minutes
Rising time - 1.5 hours total
Cooking time - 12 minutes
Yield: 20 to 25 doughnuts & 20 to 25 doughnut holes, depending on size
Ingredients
Milk 1.5 cup / 360 ml
Vegetable Shortening 1/3 cup / 80 ml / 70 gm / 2.5 oz (can substitute butter, margarine or lard)
Active Dry Yeast 4.5 teaspoon (2 pkgs.) / 22.5 ml / 14 gm / ½ oz (less if to be slow rosen in refrigerator)
Warm Water 1/3 cup / 80 ml (95°F to 105°F / 35°C to 41°C)
Eggs, Large, beaten 2
White Granulated Sugar ½ cup / 120 ml / 110 gm / 4 oz
Table Salt 1.5 teaspoon / 7.5 ml / 9 gm / 1/3 oz
Nutmeg, grated 1 tsp. / 5 ml / 6 gm / ¼ oz
All Purpose Flour 4 2/3 cup / 1,120 ml / 650 gm / 23 oz + extra for dusting surface
Canola Oil DEPENDS on size of vessel you are frying in – you want THREE (3) inches of oil (can substitute any flavorless oil used for frying)

Directions:
1. Place the milk in a medium saucepan and heat over mediuhm heat just until warm enough to melt the shortening. (Make sure the shortening is melted so that it incorporates well into the batter.)
2. Place the shortening in a bowl and pour warmed milk over. Set aside.
3. In a small bowl, sprinkle the yeast over the warm water and let dissolve for 5 minutes. It should get foamy. After 5 minutes, pour the yeast mixture into the large bowl of a stand mixer and add the milk and shortening mixture, first making sure the milk and shortening mixture has cooled to lukewarm.
4. Add the eggs, sugar, salt, nutmeg, and half of the flour. Using the paddle attachment of your mixer (if you have one), combine the ingredients on low speed until flour is incorporated and then turn the speed up to medium and beat until well combined.
5. Add the remaining flour, combining on low speed at first, and then increase the speed to medium and beat well.
6. Change to the dough hook attachment of the mixer and beat on medium speed until the dough pulls away from the bowl and becomes smooth, approximately 3 to 4 minutes (for me this only took about two minutes). If you do not have a dough hook/stand mixer – knead until the dough is smooth and not sticky.
7. Transfer (pour) the sticky doughs to a well-oiled bowl, cover, and let rise for 1 hour or until doubled in size.  *note that if you want you could refrigerate til up to 4 days at this point and let it slow rise in the refrigerator taking away a teaspoon of yeast for every day that it is to be refrigerated.

8. On a well-floured surface, roll out dough to 3/8-inch (9 mm)thick. (Make sure the surface really is well-floured otherwise your doughnuts will stick to the counter).
9. Cut out dough using a 2 1/2-inch (65 mm) doughnut cutter or pastry ring or drinking glass and using a 7/8-inch (22 mm) ring for the center whole. Set on floured baking sheet, cover lightly with a tea towel, and let rise for 30 minutes. I cut mine with cookie cutter for the baked ones and just roughly rolled the ones that were to be fried.


10. Preheat the oil in a deep fryer or Dutch oven to 365 °F/185°C.
11. Gently place the doughnuts into the oil, 3 to 4 at a time. Cook for 1 minute per side or until golden brown (my doughnuts only took about 30 seconds on each side at this temperature).
12. Transfer to a cooling rack placed in baking pan. Allow to cool for 15 to 20 minutes prior to glazing, if desired.


Served the fried doughtnut with jam, sausage and stir-fried eggs for breakfast.

**These doughnuts keeps well frozen if you've baked or fried too many. Just ziplock them right after cooled, throw in freezer. They stay very fresh for up to 3 days (that's how long they lasted in my family).

Tuesday, October 19, 2010

Daring Cook's October, 2010 Challange: Stuffed Grape (Cabbage) Leaves

Our October 2010 hostess, Lori of Lori’s Lipsmacking Goodness, has challenged The Daring Cooks to stuff grape leaves. Lori chose a recipe from Aromas of Aleppo and a recipe from The New Book of Middle Eastern Food.


The challenge this month is to make a filling and roll it in grape leaves. If grape leaves are unavailable to you then you can use Swiss chard, kale, cabbage or some tough green. Even though I am living in the land of wineries, it is not easy to get grape leaves (all the vineyards are closed now that it's not the season). So, I've substituted it with cabbage leaves which can be found all year round.


Preparation time: The recipe will take up to 2 hours, depending on how fast you roll. You can freeze them before boiling if you want to try to do half of the recipe ahead of time. It only took me 1 hour including soaking of rice AND boiling water for softening the leaves.

Grape Leaves Stuffed with Ground Meat and Rice with Apricot Tamarind Sauce/ Yebra
Adapted from Aromas of Aleppo by Poopa Dweck and Michael J. Cohen. Published by Harper Collins, 2007
Yield: 6 to 8 servings

Ingredients for hashu/filling:
1 pound (455 gm) ground (minced) beef
1/3 cup (80 ml) (2 1/3 oz) (65 gm) short grain rice
1 teaspoon (5 ml) (6 gm) all spice
2 tablespoons (30 ml) vegetable oil
1 teaspoon (5 ml) (6 gm) cinnamon
1 teaspoon (5 ml) (3 gm) kosher (coarse) salt **if using regular table salt only use ½ tsp.**
¼ teaspoon (1¼ ml) (1½ gm) white pepper
1 onion, chopped
1 cup (5½ oz) (150 gm) pine nuts **optional, I used chopped walnuts**
Directions:
1.Soak rice in water, enough to cover, for 30 minutes. Combine meat, rice, allspice, vegetable oil, cinnamon, salt, white pepper, and if desired, onion and pine nuts, in a large mixing bowl. Mix well.

Ingredients for assembly:
1 pound (455 gm) hashu/filling (see recipe above)
36 preserved grape leaves, stems trimmed, drained, rinsed and patted dry
1 tablespoon (15 ml) vegetable oil
6 dried apricots – or more if you desire (I used tomatoes instead)
3 tablespoons (45 ml) tamarind concentrate **if you can’t find it, you can omit it**
¼ cup (60 ml) freshly squeezed lemon juice
1 tablespoon (15 ml) (9 gm) kosher (coarse) salt **if using regular table salt only use 1.5 tsp.**
Notes:
If using grape leaves preserved in brine, to remove salt put them in a bowl and pour boiling water over them. Make sure that the water penetrates well between the layers, and leave them soaking for about twenty minutes, then change the water a time or two using fresh cold water.
If using fresh leaves, plunge a few at a time in boiling water for a few seconds only, until they become limp, and lift them out.
Tamarind is actually fairly easy to find. There is a paste that is in package already made up. You can find it at Asian, Mexican or Indian grocers. You can also find the pods (a little more difficult) and make it yourself. It is akin to a sweet/tangy tea flavor. If you can’t find it, you can skip the sauce all togheter. The grape leaves will be just as delicious without the sauce. But we hope that those that can find it will use it.
Directions:
1. Place a grape leaf on a flat surface, vein side up. You can trim the little stem if you would like.
2. Place about two teaspoons (10 ml) of the filling in the center of the leaf, near the stem edge.
3. Roll the leaf end to end, starting from the stem edge. As you roll, fold the sides of the leaf in toward the center. The leaf should resemble a small cigar, about 2 to 2 1/2 inches (50 mm to 65mm) long.
4. Repeat with the remaining leaves and filling.
**You can freeze the stuffed grape leaves at this point. Just line a baking sheet with wax paper. When firmly frozen, transfer to an airtight plastic bag place back in the freezer.
5. In a medium saucepan put in the vegetable oil and then place the filled grape leaves in the pot.
6. Place apricots in between the stuffed grape leaves. Cover and cook over low heat for 5- 8 minutes or until the grape leaves begin to sweat.
7. Using all three tablespoons, place a little of the tamarind concentrate, if using, over the rolls.
8. Combine lemon juice, salt, and water then add to pan, filling it ¾ full.
9. Weigh down the grape leaves with a heat proof plate or board to prevent them from unraveling. Cover and bring to a boil over medium high heat. Reduce the heat to low and simmer for about 40 minutes.
**Alternatively, place the saucepan in an oven preheated to moderate 350°F/180°C/gas mark 4 and cook for an hour.
10. Spoon cooking liquid over the grape leaves occasionally. You will know they are done, when the grape leaves are neither soupy nor dry.
11. Tilt pan sideways over serving platter, allowing the grape leaves to tumble out. Try not to handle them individually to reduce unraveling.
**Alternately you can try spooning them out very gently.

I baked mine for 50min covered up and then the last 10min without aluminum cover.

 
  Notice that I used tomatoes as I couldn't find any apricot and sprinkled with fresh parsley.

Friday, September 17, 2010

The Daring Cooks August, 2010 Challenge: Food Preservation - The apple butter of knowledge


The September 2010 Daring Cooks’ challenge was hosted by John of Eat4Fun. John chose to challenge The Daring Cooks to learn about food preservation, mainly in the form of canning and freezing. He challenged everyone to make a recipe and preserve it. John’s source for food preservation information was from The National Center for Home Food Preservation.

This was my first time canning and I wanted to work with something I had. Our host John gave us perfect backgroud and instructions that can be found here. Those who are interested in canning should really read it. I followed the apple butter recipe and also made a mix berries jam, both boiled but to be refrigerated or frozen since I have no faith in my used jar.

I can not believe how wonderful the jam tastes!!! maybe it does not have the consistency of store bought since I did not add any gel, but the taste is soooooo good I am never buying jam ever again. Thank you John!

Mix berries jam
Ingredients:
450grams of mix berries (strawberry, blueberry, raspberry,  black raspberry)
1/2 cup of white sugar
1 tbsp lemon
1 tbsp water

1. Layer berries with sugar and let sit in refrigerator for 1 hr.
2. Place candied berries all the sauce if any came out, with lemon and water and bring to boil.
4. Scoop out any foam and keep boil until thickens.
5. Place berry jam in sterilized jar.
6. Immerse jam jar in water and bring to boil for 15 min.
7. Cool jar asap in refrigerator then freeze it for long storage. Specially if the jars were not covered by water when boiling.
*The foam I added tea and made fruit tea, yum yum yum, h*ll no letting it go to waste.


Recipes: Reduced Sugar Apple Butter Recipe
Recipe Source: http://www.uga.edu/nchfp/how/can_02/apple_butter_reduced.html
John's preference is to use sweet apples (Golden Delicious) so the need for sugar is reduced. However, tart apples (Granny Smith) can be used. It’s a matter of personal preference. I used fuji apples as that's my hubbie's favorite.
Recipe: Reduced Sugar Apple Butter
Ingredient U.S. Metric Count Special Instructions
Apples 4lbs* 1.8 kg 12 Apples Cut into eights, stem and blossome end removed
Apple Cider 1 Cup 240 ml   Optional: Water or Juice
Sucralose/Splenda 1/2 Cup 120 ml   Optional: Honey, Agave or Sugar - to taste
Cinnamon, Ground 1 Tbl 15 ml    
Allspice, Ground 1/2 tsp 3 ml    
Cloves, Ground 1/4 tsp 2 ml    


Directions:
1. Wash apples well, peel and remove core, stems. Cut apples into quarters or eighths.
2. Combine apples and cider in 8-quart (about 7 ½ litre) saucepan. Cook slowly and stir occasionally to prevent sticking. Cook until apples are very soft (falling apart).
3. Smash the apple to puree or you may also pass it through food processor.
4. Combine pulp with Sucralose and spices in an 8-quart (about 7 ½ litre) saucepan. Simmer over low heat, stirring frequently. Keep it uncovered so that the water will evaporate and thicken.
5. To test for doneness, spoon a small quantity onto a clean plate; when the butter mounds on the plate without liquid separating around the edge of the butter, it is ready for processing. Another way to test for doneness is to remove a spoonful of the cooked butter on a spoon and hold it away from steam for 2 minutes. It is done if the butter remains mounded on the spoon.

6. Pour contents into desired storage container or multiple containers. I stored my apple butter in 1-cup (250ml) plastic containers with screw on tops. Refrigerate up to 2 weeks, freeze up to a year, and home canning is good for a year.

I did not have any allspice but used ground nutmeg instead.
 
Below are some info that John gave us, I just copied and pasted from The daring baker's page to keep track. 
Why Preserve Foods?
There are many reasons – save the harvest from our garden for later in the year, control the ingredients that go into our food, nostalgia (memories of our parents or grandparents), make gifts, satisfaction of making it yourself… etc. For me, it’s curiosity, controlling what I eat and just the satisfaction of making it myself.
Why foods go bad?
Before we start preserving foods, we need to know why foods spoil.
The two main culprits are
1) The obvious culprit is bacteria, molds and yeast/fungi. I call them “bad bugs.” There are “good bugs” that help with fermentation (yogurt, beer, wine, sourdough breads and pickles), but the bad bugs rots foods, gives foods an off taste and can make us sick.
2) The other culprit is enzymes. Enzymes are molecules that occur naturally in food which encourage chemical changes, some of which are desirable - help ripen fruit by converting starch to sugar, soften fruits or vegetables, or reduce acidity level. Some changes are not desirable, browning when an apple is cut, or the fruit becomes overripe where the flesh becomes soft and mushy.
The other supporting culprits are oxygen and unintentional moisture loss. Fortunately, when we eliminate microorganisms, the rest of the culprits are taken care off at the same time.
Good bugs and bad bugs keep growing and growing?
Bacteria, molds and yeast are living organisms that are present at all times – in the air, on surfaces, and on our food. In order for organisms to survive, they need food, water, oxygen (although some microorganisms can survive without oxygen) and a comfy environment.
A better way to remember food, water, oxygen and comfy place to live is by remembering “FATTOM” or “FAT TOM”. No, FATTOM is not the guitar riff to “Smoke on the Water” [F-A-T, T-T, O-M; F-A-Tee-Tee-O-M].
FAT TOM represents the six conditions microorganisms need to grow/multiply.
FAT TOM is Food, Acidity, Temperature, Time, Oxygen and Moisture.
* Food - Microorganisms, like people, need nutrients. Unfortunately, that means microorganism eat what we eat. Some microorganisms can get by with sugar while other need protein. The foods of concern from a food safety standpoint are low acid, protein rich foods, such as, meat, dairy and egg containing foods.
* Acidity – Acidity is a value between 0 to 14 (known as pH) where values less than 7 are acidic and values above 7 are alkaline. For example, water is generally neutral at pH = 7 while vinegar is acidic with a pH between 2.4 and 3.4. Most foods we eat have a neutral to acidic pH where foods with values 4.6 or higher are considered low acid foods.
* Temperature – Temperatures between 40F (4.4C) to 140F (60C) is considered the Temperature Danger Zone (TDZ) where microorganisms can grow. The optimal temperature for growth is typically between 70F (21C) to 100F (38C). Note: In the USA, the FDA is lowering the higher temperature from 140F to 135F (57C).
- Food Safety Tip: Hot foods should stay hot, above 140F (60C). Cold foods should stay cold, below 40F (4.4 C)
* Time – Given the right conditions and temperatures 40F to 140F, microorganisms start growing. Given enough time, the population will grow rapidly to levels that can make us sick.
- Food Safety Tip: Two hour rule and the Four hour rule.
Foods kept at room temperature (in the TDZ) should be refrigerated before two hours. Foods are to be thrown out after 4 hours in the TDZ. For hot days, for example a 90F (32C) day, the time is cut in half.
- Food Safety Tip: Also, cooling foods in the refrigerator, foods should be cooled within two hours (from 140F (60C) to 70F (21C)). Of course, faster is better. For example, a pot of chili beans can be cooled quickly by pouring into a baking dish where the chili beans are spread out into a thin layer.
* Oxygen – Most microorganisms need air. There are a couple bad bugs that don’t need air to grow where Clostridium botulinum (Botulism), being the most notorious bad bug that prefers a no oxygen environment.
* Moisture – Pure water is the key to life while salt water is less desirable.
How does knowing FAT TOM help us preserve food?
Food preservation works by changing the condition of our food to discourage bad bug growth. Food is what we are trying to save and Time is beyond our control. The remaining factors we can change are Acidity, Temperature, Oxygen and Moisture.
Brief summary of how each food preservation method works.
Preservation Method Acid Temperature Oxygen Moisture
Freezing   Storing foods at 0F (-17.8C) or lower Airtight packaging  
Boiling Water Canner (high acid foods)/Pressure Canner (low acid ) Some foods can be acidified using vinegar or lemon juice Heats foods to kill bad bugs and neutralize enzymes Jars form a vacuum seal – creates a low oxygen environment
Pickling and Fermentation Food is acidified by using vinegar or natural bacteria creating lactic acid     Brines (salted water) and sugars reduce fresh water
Drying Airtight packaging Removes up to 90% of the moisture
Jam and Jellies Vinegar or Lemon juice, Fruits naturally acidic Cooking, canning or Freezing Canning will create a vacuum seal Sugar reduces water available
For this daring challenge, we will be focusing on Freezing and Boiling Water Canning.
Freezing:
Freezing refers to storing foods in airtight containers at 0ºF (-17.8ºC) or lower. Freezing does not kill bad bugs. The cold temperature causes the microorganisms to go into hibernation/suspended animation.
Freezing is the easiest food preservation method, especially with modern freezers.
The main pointers for freezing:
1) Freeze foods quickly. Quickly freezing creates smaller ice crystals. Water is a funny substance where water expands when frozen. This means larger ice crystals can puncture cell walls (such as whole berries) so when defrosted you end up with a mushy mass.
2) Try not to freeze too much at once. Typical advice 2 to 3 lbs (1 kg) per cubic foot (28 Liters) of freezer space.
3) Containers should be airtight and leak proof.
4) Minimize air and gaps in the packaging. This reduces the chance for freezer burn – drying.
5) Label and date the package. Frozen foods tend to look the same over time, especially when a layer of ice has formed.
6) Vegetables can be blanched to deactivate enzymes. Blanching is quick cooking in boiling water for a few minutes and cooled rapidly in ice water.
7) For initial freezing using pliable freezer bags, freeze on a smooth, flat surface to prevent the bag from molding itself to the rack.
Boiling Water Canning:
Boiling water canning sterilizes the food using the temperature of boiling water. The jars form a vacuum seal which creates a low air/oxygen environment.
Important!
The temperature that water boils varies with altitude. At sea level, water boils at 212ºF (100ºC) while at 5,000 ft (1524 m) water boils at 203ºF (95ºC). What this means is canning (processing) times increase with altitude. Fortunately, we don’t need to do the math. Canning recipes include processing times for different altitudes
Boiling water canning is appropriate for high acid foods (foods with pH values lower than 4.6). Typically, fruits are high acid foods while vegetables are low acid. There are a few fruits that are on the border (pH 4.6), such as, tomatoes. However, some borderline pH foods can be acidified by adding vinegar or lemon juice. In home canning, lemon juice (and lime juice) refer to bottled concentrate, unless the recipe calls for fresh. Also, vinegar refers to vinegar with 5% acidity. The percentage strength can be found on the label.
In the USA, home canning uses Mason jars, a thick-walled jar. The lid is a two piece assembly – the lid with a reddish sealing compound and a metal band/ring.
Jars should be inspected before each use – looking for cracks and chips. Washed with detergent dish soap and dried. To reduce thermal shock (hot food cracking a cold jar), the jars should be kept hot. Clean jars can be kept hot by submerging in the boiling water canner or in a dishwasher. Also, a warm oven can be used.
For processing (canning) times less than 10 minutes, the jars need to be sterilized for 10 minutes in boiling water. For altitudes higher than a 1,000 ft (305 meters), an additional minute is added for each 1,000 ft (305 meters) above sea level.
Jars, Lids and Rings
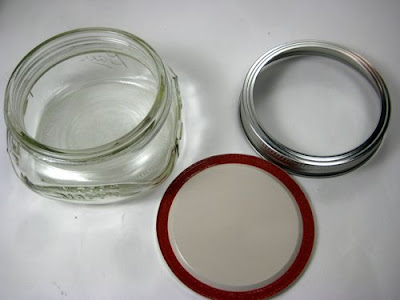
Figure illustrates the jars and lids used in the USA.
The basic steps for using a boiling water canning.
1. Check your jars for chips, cracks and nicks. Wash and preheat your jars.
2. Fill you canner half full with water. Preheat water to 140ºF (60ºC) for raw packing foods or 180ºF (82ºC) for hot packing foods.
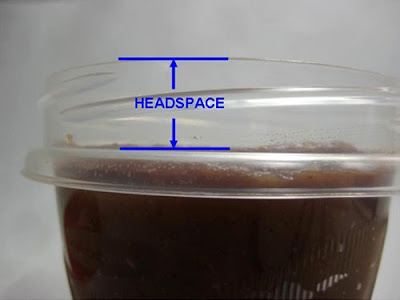
3. Fill jars with food prepared according to the recipe, remove bubbles and adjust headspace.
4. Load jars into the canner. It’s important to keep the jars level.
5. Add more hot water, as needed, so the jars are submerged by at least 1 inch (2.54 cm) of water.
6. Cover the canner with the lid and turn the heat to high.
7. Set timer when the water comes to a vigorous boil. You can lower the heat, but the boil must be maintained.
8. When the time is up, turn off the heat and remove the lid. Wait 5 more minutes.
9. Remove jars making sure the jars are level and set on a towel. Allow to cool to room temperature, undisturbed for 12 to 24 hours.
Terminology
Headspace – is the gap between the top of the container to the level of the liquid or food.
For freezing, headspace is important to ensure there is room in the container for the expanding food. For canning, headspace ensures that a proper vacuum seal will form without the food spilling out of the jars while canning.
Headspace
Raw Pack (canning) – foods are placed in jars raw and, typically, a flavored liquid is added to the jars before processing. Advantages: Food is not cooked twice. Retains shape better. Disadvantages: Uses more jars. Foods may float due to trapped air.
Hot Pack (canning) – foods are cooked before jarring. Advantages: Foods are cooked down so more can be packed into a jar. Less air in food. Disadvantages: Original shape is lost.

Saturday, September 11, 2010

Almond Biscotti - The no oil snack ^-^


After baking a failed chiffon cake, with extra time (cus my hubby's playing mass effect 2 for 8hrs non-stop now) I've decided to bake some biscotti, the traditional Almond Biscotti found on The Joy of Baking with a little change (I doubled the recipe, less sugar, less almond, and added sesami).


Yields 30pcs of biscotti 
Ingredients:         
1 cup (145 grams) whole almonds, toasted and chopped coarsely
1/2 cup of toasted sesami (white or black)  
2 teaspoon (10 grams) baking powder
1/4 teaspoon salt
4 cups (520 grams) all-purpose flour
1/2 cup (150 grams) granulated white sugar
1/2 cup (150 grams) granulated brown sugar 
6 large eggs
2 teaspoon pure vanilla extract
1 teaspoon pure almond extract (I didn't have any so added none)

Preheat the oven to 150 Celcius (300F).
1. Beat all the wet ingredients (eggs, vanilla and almond extract) with sugar til cream.
2. Mix all the dry ingredients in a separate bowl and add in the mixed wet ingredients. Becareful not to over knead.
3. Lightly flour parchment paper. 
4. Shape the dough into logs of  3cm (1.2 inches) thick, I made mine 3 logs of 13*25cm (doubling recipe).
*Note that it will rise to almost twice its height and spread a little bit.
5. Bake in 150Celcius for 30min~35min.
6. Remove and cool on rack. (keep the oven on)
7. Cut the log into biscuits of 2cm thick (that's the thickness I like) and arrange on baking sheet.
8. Bake for 15min both sides (flip them over and bake for another 15 min).

Totally love this no-oil snack!!!! The dough sticks to hands so wet or lightly flour your hands. I also used a spatula. 

*Edit 14th of September* After the cookies were done I waited for 2 hours to cool then placed them in zipper bags. The next day, they were a bit chewy in the middle with "flour" taste. I re-baked them for 20min at 150Celcius (without flipping). Let them sat in the oven until overnight, then zipped bagged them. It's been 2 days and they are still crunchy with the best "egg" flavour, like Taiwanese 孔雀餅乾.

Saturday, August 28, 2010

Sweet Cauliflower-Brocoli


I've came across the sweetest cauliflower (or is it broccoli?) by the Mapucho River's feria.
Each bud is a swirl with a pointy top, they are so much more.. bushy than the normal cauliflower or broccoli. The taste is sweeter than both and soft like the cauliflower.
Whenever I see one, I buy it, LOL it's just so good plus I can keep them frozen once slightly steamed (or boiled) and salted.

August 2010 daring baker's challenge ~ Nutty and toasty meets cool and creamy...

The August 2010 Daring Bakers’ challenge was hosted by Elissa of 17 and Baking. For the first time, The Daring Bakers partnered with Sugar High Fridays for a co-event and Elissa was the gracious hostess of both. Using the theme of beurre noisette, or browned butter, Elissa chose to challenge Daring Bakers to make a pound cake to be used in either a Baked Alaska or in Ice Cream Petit Fours. The sources for Elissa’s challenge were Gourmet magazine and David Lebovitz’s “The Perfect Scoop”.

This time's challenge was to make Petite Fours or Baked Alaska. It is mandatory to make ice cream from scratch (which I do not have too much experience with) and brown butter pound cake which I followed. I tried adding 1 table spoon of green tea powder in the milk content for the icecream before freezing, the rest you should really just follow the given recipe.

Directions:

Vanilla Ice Cream
1 cup (250ml) whole milk
A pinch of salt
3/4 cup (165g) sugar
1 vanilla bean, split lengthwise OR 2 teaspoons (10ml) pure vanilla extract
2 cups (500ml) heavy (approx 35% butterfat) cream
5 large egg yolks
1 teaspoon (5ml) pure vanilla extract

1. Heat the milk, salt, and sugar in a medium saucepan until the liquid steams. Scrape out the seeds of the vanilla bean with a paring knife and add to the milk, along with the bean pod. Cover, remove from heat, and let infuse for an hour. (If you do not have a vanilla bean, simply heat the milk, salt, and sugar in a medium saucepan until the liquid steams, then let cool to room temperature.)
2. Set up an ice bath by placing a 2-quart (2 litre) bowl inside a large bowl partially filled with water and ice. Put a strainer on top of the smaller bowl and pour in the cream.
3. In another bowl, lightly beat the egg yolks together. Reheat the milk in the medium saucepan until warmed, and then gradually pour ¼ cup warmed milk into the yolks, constantly whisking to keep the eggs from scrambling. Once the yolks are warmed, scrape the yolk and milk mixture back into the saucepan of warmed milk and cook over low heat. Stir constantly and scrape the bottom with a spatula until the mixture thickens into a custard which thinly coats the back of the spatula.
4. Strain the custard into the heavy cream and stir the mixture until cooled. Add the vanilla extract (1 teaspoon [5ml] if you are using a vanilla bean; 3 teaspoons [15ml] if you are not using a vanilla bean) and refrigerate until thoroughly chilled, preferably overnight.
5. Remove the vanilla bean and freeze in an ice cream maker. If you don’t have an ice cream maker, you can make it without a machine. See instructions from David Lebovitz: http://www.davidlebovitz.com/archives/2007/07/making_ice_crea_1.html

**What I did was take it out of the freezer every 2 hours, when the outer rim starts to freeze and beat it up for 1 min or until smooth and foamy. Repeat 3 times then freeze over night.


Brown Butter Pound Cake
19 tablespoons (9.5 oz) (275g) unsalted (sweet) butter
2 cups (200g) sifted cake flour (not self-rising; sift before measuring) (See “Note” section for cake flour substitution)
1 teaspoon (5g) baking powder
1/2 teaspoon (3g) salt
1/2 cup (110g) packed light brown sugar
1/3 (75g) cup granulated sugar
4 large eggs
1/2 teaspoon pure vanilla extract

1. Preheat the oven to 325°F/160°C and put a rack in the center. Butter and flour a 9”x9” (23cmx23cm) square pan.
2. Place the butter in a 10” (25cm) skillet over medium heat. Brown the butter until the milk solids are a dark chocolate brown and the butter smells nutty. (Don’t take your eyes off the butter in case it burns.) Pour into a shallow bowl and chill in the freezer until just congealed, 15-30 minutes. 
It will first start to bubble, once it rises like boiled milk, turn off the heat immediately
as you might not see the browning until the froth disappears.

3. Whisk together cake flour, baking powder, and salt.
4. Beat the brown butter, light brown sugar, and granulated sugar in an electric mixer until light and fluffy, about 2 minutes. Beat in the eggs one at a time, mixing well, and then the vanilla extract.
5. Stir in the flour mixture at low speed until just combined.
6. Scrape the batter into the greased and floured 9”x9” (23cmx23cm) square pan. Smooth the top with a rubber spatula and rap the pan on the counter. Bake until golden brown on top and when a toothpick inserted into the center comes out clean, about 25 minutes.
7. Cool in the pan 10 minutes. Run a knife along the edge and invert right-side-up onto a cooling rack to cool completely.


Chocolate Glaze (For the Ice Cream Petit Fours)
9 ounces (250g) dark chocolate, finely chopped
1 cup (250 ml) heavy (approx 35% butterfat) cream
1 1/2 tablespoons (32g) light corn syrup, Golden syrup, or agave nectar
2 teaspoons (10ml) vanilla extract
Stir the heavy cream and light corn syrup in a small saucepan over medium heat until it comes to a boil. Remove from heat and add the dark chocolate. Let sit 30 seconds, then stir to completely melt the chocolate. Stir in the vanilla and let cool until tepid before glazing the petit fours.

Assembly Instructions – Ice Cream Petit Fours
1. Line a 9”x9” (23cmx23cm) pan with plastic wrap, so that no sides of the pan are exposed and so there is some extra plastic wrap hanging off the sides. Spread 1 ¾ to 2 cups (450ml to 500ml) ice cream into the pan. Cover with more plastic wrap and freeze several hours.
2. Once the brown butter pound cake has completely cooled, level the top with a cake leveler or a serrated knife. Then split the cake in half horizontally to form two thin layers.
3. Unwrap the frozen ice cream. Flip out onto one of the layers of cake and top with the second layer of cake. Wrap well in plastic wrap and return to the freezer overnight.
4. Make the chocolate glaze (see above.)
5. While the glaze cools, trim ¾” (2cm) off each side of the ice cream cake to leave a perfectly square 7.5” (19cm) ice cream cake. Cut the cake into twenty five petit fours, each 1.5”x1.5” (4cmx4cm).
6. Glaze the petit fours one at a time: place a petit four on a fork and spoon chocolate glaze over it.
7. Place the petit fours on a parchment-lined baking sheet and return to the freezer for one hour.


 This is my first pound cake, both eat and bake, so not sure if it is suppose to be crumbly and dry. I will definitely improvise with the brown butter which smells and tastes soooooo GOOD! But the pound cake is not to either mine or my mom's liking (dear hubby's kind enough to say it's good but I know he likes the soft sponge cake better). The Green tea icecream was not good, I guess it's cus..... I subbed this time 1 cup of cream with 1 cup of evaporated milk, will not EVER do this EVER again. Oh and the top I used white chocolate... as you experts will know... I over boiled it (did it over water but still too hot).

Sunday, August 15, 2010

The Daring Cooks August, 2010 Challenge: The World of Pierogi I


The August 2010 Daring Cooks’ Challenge was hosted by LizG of Bits n’ Bites and Anula of Anula’s Kitchen. They chose to challenge Daring Cooks to make pierogi from scratch and an optional challenge to provide one filling that best represents their locale.

The challenge is to make the dough from scratch and a savory or sweet filling of our choice. Well, but what is a Pierogi? Being Chinese, I think it is dumpling/wonton (steamed, boiled, fried, souped) or growing up in Paraguay, it must be Empanadas (baked or fried) ^-^

During the past month, I've ate lots of empanadas but have not made any myself, truth be told, I love it fried but can't stand the oily-odor that is created when something is fried. So here's my Chinese dumpling.

Dough Ingredients:
500g of high protein flour
1 cup of water
1 tsp of veg. oil

Knead for 10 min. Place in bowl, cover with wet towel or plastic wrap, let sit for 30min~1hr in cool area (my mom likes to put it in the fridge).

Meat filling Ingredients:
500g grind meat (beef of atleast 5% fat)
1/2 cup cold water
1 cup green onion chopped
2 tbsp minced ginger
3 tbsp soysauce ( or more if you like it saltier)
1 tbsp sesame oil
1/2 tbsp grind black pepper

Mix all the ingredients together EXCEPT the water and beat in water little by little until it is all absorbed by the meat (takes around 1min with my Kitchen-Aid).


Or if you like it more typical Chinese will be pork with cabbage:
Pork filling Ingredients:
500g grind pork (usually pork front shoulder)
3 cup finely chopped up cabbage (great if you have food processor, but don't grind it too thin! 0.5cm~1cm is good).
1/3 cup cold water
1/2 cup green onion chopped
2 tbsp minced ginger
2 tbsp soysauce ( or more if you like it saltier)
1 tbsp sesame oil
1 tsp grind white pepper
1/2 tbsp salt

1. Mix the cabbage with salt. Toss and press, discard the water that comes out of the cabbage until the cabbage dehydrates to 2 1/2 cup or less. 
2. Mix all the ingredients together (EXCEPT the cabbage) and beat for 1 min until bouncy and smooth.
3. Mix in cabbage.

* That's my mom!!! ^-^

Once you have everything ready, it is time to make the "skin" (pasta shell). I will be VERY detailed as it is crucial to have a thick center and thin outer shell instead of making a large flat dough and cut them up with circular molds, NO NO NO.


Shell:
1. Cut 1/2 of the dough and leave the rest covered up.
2. Knead the dough in to a thin long strip (4cm diameter).
3. Cut the strip in pieces 3 cm wide. You may want to roll-rotate the dough 90 degrees after each cut so the pieces won't be flattened.
4. Spread loose flour over and under the doughs so that they don't stick.
5. Slightly shape the dough so that they have 2 flat sides (what you've cut) and a circular shape outside.
6. Flatten each dough with your palm, they should now be a flat circular dough of around 1.5cm thick.
7. Lightly hold one side of the dough using your left hand's thumb and index finger. Rotate the dough in one direction WHILE rolling the opposite side of the dough with a rolling pin with your right hand.
8. You should now have a shell with a thicker center (0.6cm) and thin outer circumference (0.2cm).
9. Repeat and repeat. Do the samething with the other 1/2 large piece of dough if you are fast, if not, put in the fillings and cover up with plastic wrap cus once the dough dries up it will not seal nicely.
 Here's one with 1/2 a shrimp

Boiled dumplings:
1. Place dumplings in boiling water ( the water should be twice the dumpling's height). Gently stir the dumpling while putting them in so that they won't stick to the bottom or with each other. 
2. Cover up the pot until the water re-boils with medium heat.
3. Add 1 cup of water and wait for the water to boil again.
4. Repeat until 3 cups of waters in total were added.
5. Check if the dumplings are floating on the boiling water and inflated, if yes, then they are ready to be served! ^-^

Crispy pan fried dumplings is my favorite but it's a bit higher in calories:
Ingredients:
1 tbsp veg. oil
water to cover up dumplings
1 tbsp sesame oil
1 tsp corn starch

1. Heat fry pan (not too shallow) with 1 tbsp veg. oil.
2. Place in dumplings (1 layer only) right next to each other with the sealing side up.
3. Fry in high heat for 30sec.
4. Add in enough water mixed with 1tsp corn starch to almost covering up the dumplings.

5. Cover up the pan as it boils in medium heat. Large water bubbles should appear in between  dumplings (usually takes around 15min).
6. Take off the over, add 1 tbsp sesame oil and cook until the waters are dried out and only oil is left.
7. DO NOT move the dumplings EVER once you put them in the pan. With the cornstarch and some of the loose flours on the dumplings, they should kindda stick to each other after fried.
8. You will know it is dry enough when you shake the pan and the dumplings all move at once (together) or you may check under the dumplings to see if they are golden.
9. Place the dish on top of the pan and turn it upside down. You should get a round dish of golden dumplings! ^-^


Dumpling Sauce dip:
1 tbsp minced fresh garlic
1 tbsp vinegar
1/2 tsp sesame oil
2 tbsp soy sauce
Mix and use as a dip, do not pour all over the dumplings! You may add a bit of hot pepper if you like it more spicy.

These raw dumplings freeze well. Just put them in the freezer in a pan or dish covered up with plastic wrap. Once they are frozen, I usually just zip lock them.
The ones at the left are made by Mumu, very cautiously sealed, and the ones at the right are by me! I use the arc between my thumb and index finger of both hands as the Pierogi form and press them seal.