Showing posts with label sweets. Show all posts

Friday, September 17, 2010

The Daring Cooks August, 2010 Challenge: Food Preservation - The apple butter of knowledge


The September 2010 Daring Cooks’ challenge was hosted by John of Eat4Fun. John chose to challenge The Daring Cooks to learn about food preservation, mainly in the form of canning and freezing. He challenged everyone to make a recipe and preserve it. John’s source for food preservation information was from The National Center for Home Food Preservation.

This was my first time canning and I wanted to work with something I had. Our host John gave us perfect backgroud and instructions that can be found here. Those who are interested in canning should really read it. I followed the apple butter recipe and also made a mix berries jam, both boiled but to be refrigerated or frozen since I have no faith in my used jar.

I can not believe how wonderful the jam tastes!!! maybe it does not have the consistency of store bought since I did not add any gel, but the taste is soooooo good I am never buying jam ever again. Thank you John!

Mix berries jam
Ingredients:
450grams of mix berries (strawberry, blueberry, raspberry,  black raspberry)
1/2 cup of white sugar
1 tbsp lemon
1 tbsp water

1. Layer berries with sugar and let sit in refrigerator for 1 hr.
2. Place candied berries all the sauce if any came out, with lemon and water and bring to boil.
4. Scoop out any foam and keep boil until thickens.
5. Place berry jam in sterilized jar.
6. Immerse jam jar in water and bring to boil for 15 min.
7. Cool jar asap in refrigerator then freeze it for long storage. Specially if the jars were not covered by water when boiling.
*The foam I added tea and made fruit tea, yum yum yum, h*ll no letting it go to waste.


Recipes: Reduced Sugar Apple Butter Recipe
Recipe Source: http://www.uga.edu/nchfp/how/can_02/apple_butter_reduced.html
John's preference is to use sweet apples (Golden Delicious) so the need for sugar is reduced. However, tart apples (Granny Smith) can be used. It’s a matter of personal preference. I used fuji apples as that's my hubbie's favorite.
Recipe: Reduced Sugar Apple Butter
Ingredient U.S. Metric Count Special Instructions
Apples 4lbs* 1.8 kg 12 Apples Cut into eights, stem and blossome end removed
Apple Cider 1 Cup 240 ml   Optional: Water or Juice
Sucralose/Splenda 1/2 Cup 120 ml   Optional: Honey, Agave or Sugar - to taste
Cinnamon, Ground 1 Tbl 15 ml    
Allspice, Ground 1/2 tsp 3 ml    
Cloves, Ground 1/4 tsp 2 ml    


Directions:
1. Wash apples well, peel and remove core, stems. Cut apples into quarters or eighths.
2. Combine apples and cider in 8-quart (about 7 ½ litre) saucepan. Cook slowly and stir occasionally to prevent sticking. Cook until apples are very soft (falling apart).
3. Smash the apple to puree or you may also pass it through food processor.
4. Combine pulp with Sucralose and spices in an 8-quart (about 7 ½ litre) saucepan. Simmer over low heat, stirring frequently. Keep it uncovered so that the water will evaporate and thicken.
5. To test for doneness, spoon a small quantity onto a clean plate; when the butter mounds on the plate without liquid separating around the edge of the butter, it is ready for processing. Another way to test for doneness is to remove a spoonful of the cooked butter on a spoon and hold it away from steam for 2 minutes. It is done if the butter remains mounded on the spoon.

6. Pour contents into desired storage container or multiple containers. I stored my apple butter in 1-cup (250ml) plastic containers with screw on tops. Refrigerate up to 2 weeks, freeze up to a year, and home canning is good for a year.

I did not have any allspice but used ground nutmeg instead.
 
Below are some info that John gave us, I just copied and pasted from The daring baker's page to keep track. 
Why Preserve Foods?
There are many reasons – save the harvest from our garden for later in the year, control the ingredients that go into our food, nostalgia (memories of our parents or grandparents), make gifts, satisfaction of making it yourself… etc. For me, it’s curiosity, controlling what I eat and just the satisfaction of making it myself.
Why foods go bad?
Before we start preserving foods, we need to know why foods spoil.
The two main culprits are
1) The obvious culprit is bacteria, molds and yeast/fungi. I call them “bad bugs.” There are “good bugs” that help with fermentation (yogurt, beer, wine, sourdough breads and pickles), but the bad bugs rots foods, gives foods an off taste and can make us sick.
2) The other culprit is enzymes. Enzymes are molecules that occur naturally in food which encourage chemical changes, some of which are desirable - help ripen fruit by converting starch to sugar, soften fruits or vegetables, or reduce acidity level. Some changes are not desirable, browning when an apple is cut, or the fruit becomes overripe where the flesh becomes soft and mushy.
The other supporting culprits are oxygen and unintentional moisture loss. Fortunately, when we eliminate microorganisms, the rest of the culprits are taken care off at the same time.
Good bugs and bad bugs keep growing and growing?
Bacteria, molds and yeast are living organisms that are present at all times – in the air, on surfaces, and on our food. In order for organisms to survive, they need food, water, oxygen (although some microorganisms can survive without oxygen) and a comfy environment.
A better way to remember food, water, oxygen and comfy place to live is by remembering “FATTOM” or “FAT TOM”. No, FATTOM is not the guitar riff to “Smoke on the Water” [F-A-T, T-T, O-M; F-A-Tee-Tee-O-M].
FAT TOM represents the six conditions microorganisms need to grow/multiply.
FAT TOM is Food, Acidity, Temperature, Time, Oxygen and Moisture.
* Food - Microorganisms, like people, need nutrients. Unfortunately, that means microorganism eat what we eat. Some microorganisms can get by with sugar while other need protein. The foods of concern from a food safety standpoint are low acid, protein rich foods, such as, meat, dairy and egg containing foods.
* Acidity – Acidity is a value between 0 to 14 (known as pH) where values less than 7 are acidic and values above 7 are alkaline. For example, water is generally neutral at pH = 7 while vinegar is acidic with a pH between 2.4 and 3.4. Most foods we eat have a neutral to acidic pH where foods with values 4.6 or higher are considered low acid foods.
* Temperature – Temperatures between 40F (4.4C) to 140F (60C) is considered the Temperature Danger Zone (TDZ) where microorganisms can grow. The optimal temperature for growth is typically between 70F (21C) to 100F (38C). Note: In the USA, the FDA is lowering the higher temperature from 140F to 135F (57C).
- Food Safety Tip: Hot foods should stay hot, above 140F (60C). Cold foods should stay cold, below 40F (4.4 C)
* Time – Given the right conditions and temperatures 40F to 140F, microorganisms start growing. Given enough time, the population will grow rapidly to levels that can make us sick.
- Food Safety Tip: Two hour rule and the Four hour rule.
Foods kept at room temperature (in the TDZ) should be refrigerated before two hours. Foods are to be thrown out after 4 hours in the TDZ. For hot days, for example a 90F (32C) day, the time is cut in half.
- Food Safety Tip: Also, cooling foods in the refrigerator, foods should be cooled within two hours (from 140F (60C) to 70F (21C)). Of course, faster is better. For example, a pot of chili beans can be cooled quickly by pouring into a baking dish where the chili beans are spread out into a thin layer.
* Oxygen – Most microorganisms need air. There are a couple bad bugs that don’t need air to grow where Clostridium botulinum (Botulism), being the most notorious bad bug that prefers a no oxygen environment.
* Moisture – Pure water is the key to life while salt water is less desirable.
How does knowing FAT TOM help us preserve food?
Food preservation works by changing the condition of our food to discourage bad bug growth. Food is what we are trying to save and Time is beyond our control. The remaining factors we can change are Acidity, Temperature, Oxygen and Moisture.
Brief summary of how each food preservation method works.
Preservation Method Acid Temperature Oxygen Moisture
Freezing   Storing foods at 0F (-17.8C) or lower Airtight packaging  
Boiling Water Canner (high acid foods)/Pressure Canner (low acid ) Some foods can be acidified using vinegar or lemon juice Heats foods to kill bad bugs and neutralize enzymes Jars form a vacuum seal – creates a low oxygen environment
Pickling and Fermentation Food is acidified by using vinegar or natural bacteria creating lactic acid     Brines (salted water) and sugars reduce fresh water
Drying Airtight packaging Removes up to 90% of the moisture
Jam and Jellies Vinegar or Lemon juice, Fruits naturally acidic Cooking, canning or Freezing Canning will create a vacuum seal Sugar reduces water available
For this daring challenge, we will be focusing on Freezing and Boiling Water Canning.
Freezing:
Freezing refers to storing foods in airtight containers at 0ºF (-17.8ºC) or lower. Freezing does not kill bad bugs. The cold temperature causes the microorganisms to go into hibernation/suspended animation.
Freezing is the easiest food preservation method, especially with modern freezers.
The main pointers for freezing:
1) Freeze foods quickly. Quickly freezing creates smaller ice crystals. Water is a funny substance where water expands when frozen. This means larger ice crystals can puncture cell walls (such as whole berries) so when defrosted you end up with a mushy mass.
2) Try not to freeze too much at once. Typical advice 2 to 3 lbs (1 kg) per cubic foot (28 Liters) of freezer space.
3) Containers should be airtight and leak proof.
4) Minimize air and gaps in the packaging. This reduces the chance for freezer burn – drying.
5) Label and date the package. Frozen foods tend to look the same over time, especially when a layer of ice has formed.
6) Vegetables can be blanched to deactivate enzymes. Blanching is quick cooking in boiling water for a few minutes and cooled rapidly in ice water.
7) For initial freezing using pliable freezer bags, freeze on a smooth, flat surface to prevent the bag from molding itself to the rack.
Boiling Water Canning:
Boiling water canning sterilizes the food using the temperature of boiling water. The jars form a vacuum seal which creates a low air/oxygen environment.
Important!
The temperature that water boils varies with altitude. At sea level, water boils at 212ºF (100ºC) while at 5,000 ft (1524 m) water boils at 203ºF (95ºC). What this means is canning (processing) times increase with altitude. Fortunately, we don’t need to do the math. Canning recipes include processing times for different altitudes
Boiling water canning is appropriate for high acid foods (foods with pH values lower than 4.6). Typically, fruits are high acid foods while vegetables are low acid. There are a few fruits that are on the border (pH 4.6), such as, tomatoes. However, some borderline pH foods can be acidified by adding vinegar or lemon juice. In home canning, lemon juice (and lime juice) refer to bottled concentrate, unless the recipe calls for fresh. Also, vinegar refers to vinegar with 5% acidity. The percentage strength can be found on the label.
In the USA, home canning uses Mason jars, a thick-walled jar. The lid is a two piece assembly – the lid with a reddish sealing compound and a metal band/ring.
Jars should be inspected before each use – looking for cracks and chips. Washed with detergent dish soap and dried. To reduce thermal shock (hot food cracking a cold jar), the jars should be kept hot. Clean jars can be kept hot by submerging in the boiling water canner or in a dishwasher. Also, a warm oven can be used.
For processing (canning) times less than 10 minutes, the jars need to be sterilized for 10 minutes in boiling water. For altitudes higher than a 1,000 ft (305 meters), an additional minute is added for each 1,000 ft (305 meters) above sea level.
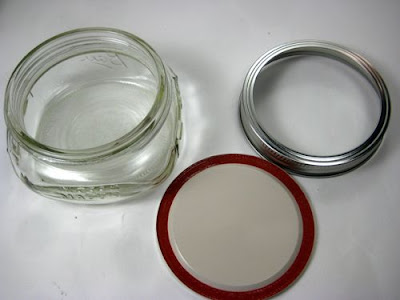
Jars, Lids and Rings
Figure illustrates the jars and lids used in the USA.
The basic steps for using a boiling water canning.
1. Check your jars for chips, cracks and nicks. Wash and preheat your jars.
2. Fill you canner half full with water. Preheat water to 140ºF (60ºC) for raw packing foods or 180ºF (82ºC) for hot packing foods.
3. Fill jars with food prepared according to the recipe, remove bubbles and adjust headspace.
4. Load jars into the canner. It’s important to keep the jars level.
5. Add more hot water, as needed, so the jars are submerged by at least 1 inch (2.54 cm) of water.
6. Cover the canner with the lid and turn the heat to high.
7. Set timer when the water comes to a vigorous boil. You can lower the heat, but the boil must be maintained.
8. When the time is up, turn off the heat and remove the lid. Wait 5 more minutes.
9. Remove jars making sure the jars are level and set on a towel. Allow to cool to room temperature, undisturbed for 12 to 24 hours.
Terminology
Headspace – is the gap between the top of the container to the level of the liquid or food.
For freezing, headspace is important to ensure there is room in the container for the expanding food. For canning, headspace ensures that a proper vacuum seal will form without the food spilling out of the jars while canning.
Headspace
Raw Pack (canning) – foods are placed in jars raw and, typically, a flavored liquid is added to the jars before processing. Advantages: Food is not cooked twice. Retains shape better. Disadvantages: Uses more jars. Foods may float due to trapped air.
Hot Pack (canning) – foods are cooked before jarring. Advantages: Foods are cooked down so more can be packed into a jar. Less air in food. Disadvantages: Original shape is lost.

Saturday, September 11, 2010

Almond Biscotti - The no oil snack ^-^


After baking a failed chiffon cake, with extra time (cus my hubby's playing mass effect 2 for 8hrs non-stop now) I've decided to bake some biscotti, the traditional Almond Biscotti found on The Joy of Baking with a little change (I doubled the recipe, less sugar, less almond, and added sesami).


Yields 30pcs of biscotti 
Ingredients:         
1 cup (145 grams) whole almonds, toasted and chopped coarsely
1/2 cup of toasted sesami (white or black)  
2 teaspoon (10 grams) baking powder
1/4 teaspoon salt
4 cups (520 grams) all-purpose flour
1/2 cup (150 grams) granulated white sugar
1/2 cup (150 grams) granulated brown sugar 
6 large eggs
2 teaspoon pure vanilla extract
1 teaspoon pure almond extract (I didn't have any so added none)

Preheat the oven to 150 Celcius (300F).
1. Beat all the wet ingredients (eggs, vanilla and almond extract) with sugar til cream.
2. Mix all the dry ingredients in a separate bowl and add in the mixed wet ingredients. Becareful not to over knead.
3. Lightly flour parchment paper. 
4. Shape the dough into logs of  3cm (1.2 inches) thick, I made mine 3 logs of 13*25cm (doubling recipe).
*Note that it will rise to almost twice its height and spread a little bit.
5. Bake in 150Celcius for 30min~35min.
6. Remove and cool on rack. (keep the oven on)
7. Cut the log into biscuits of 2cm thick (that's the thickness I like) and arrange on baking sheet.
8. Bake for 15min both sides (flip them over and bake for another 15 min).

Totally love this no-oil snack!!!! The dough sticks to hands so wet or lightly flour your hands. I also used a spatula. 

*Edit 14th of September* After the cookies were done I waited for 2 hours to cool then placed them in zipper bags. The next day, they were a bit chewy in the middle with "flour" taste. I re-baked them for 20min at 150Celcius (without flipping). Let them sat in the oven until overnight, then zipped bagged them. It's been 2 days and they are still crunchy with the best "egg" flavour, like Taiwanese 孔雀餅乾.

Saturday, August 28, 2010

August 2010 daring baker's challenge ~ Nutty and toasty meets cool and creamy...

The August 2010 Daring Bakers’ challenge was hosted by Elissa of 17 and Baking. For the first time, The Daring Bakers partnered with Sugar High Fridays for a co-event and Elissa was the gracious hostess of both. Using the theme of beurre noisette, or browned butter, Elissa chose to challenge Daring Bakers to make a pound cake to be used in either a Baked Alaska or in Ice Cream Petit Fours. The sources for Elissa’s challenge were Gourmet magazine and David Lebovitz’s “The Perfect Scoop”.

This time's challenge was to make Petite Fours or Baked Alaska. It is mandatory to make ice cream from scratch (which I do not have too much experience with) and brown butter pound cake which I followed. I tried adding 1 table spoon of green tea powder in the milk content for the icecream before freezing, the rest you should really just follow the given recipe.

Directions:

Vanilla Ice Cream
1 cup (250ml) whole milk
A pinch of salt
3/4 cup (165g) sugar
1 vanilla bean, split lengthwise OR 2 teaspoons (10ml) pure vanilla extract
2 cups (500ml) heavy (approx 35% butterfat) cream
5 large egg yolks
1 teaspoon (5ml) pure vanilla extract

1. Heat the milk, salt, and sugar in a medium saucepan until the liquid steams. Scrape out the seeds of the vanilla bean with a paring knife and add to the milk, along with the bean pod. Cover, remove from heat, and let infuse for an hour. (If you do not have a vanilla bean, simply heat the milk, salt, and sugar in a medium saucepan until the liquid steams, then let cool to room temperature.)
2. Set up an ice bath by placing a 2-quart (2 litre) bowl inside a large bowl partially filled with water and ice. Put a strainer on top of the smaller bowl and pour in the cream.
3. In another bowl, lightly beat the egg yolks together. Reheat the milk in the medium saucepan until warmed, and then gradually pour ¼ cup warmed milk into the yolks, constantly whisking to keep the eggs from scrambling. Once the yolks are warmed, scrape the yolk and milk mixture back into the saucepan of warmed milk and cook over low heat. Stir constantly and scrape the bottom with a spatula until the mixture thickens into a custard which thinly coats the back of the spatula.
4. Strain the custard into the heavy cream and stir the mixture until cooled. Add the vanilla extract (1 teaspoon [5ml] if you are using a vanilla bean; 3 teaspoons [15ml] if you are not using a vanilla bean) and refrigerate until thoroughly chilled, preferably overnight.
5. Remove the vanilla bean and freeze in an ice cream maker. If you don’t have an ice cream maker, you can make it without a machine. See instructions from David Lebovitz: http://www.davidlebovitz.com/archives/2007/07/making_ice_crea_1.html

**What I did was take it out of the freezer every 2 hours, when the outer rim starts to freeze and beat it up for 1 min or until smooth and foamy. Repeat 3 times then freeze over night.


Brown Butter Pound Cake
19 tablespoons (9.5 oz) (275g) unsalted (sweet) butter
2 cups (200g) sifted cake flour (not self-rising; sift before measuring) (See “Note” section for cake flour substitution)
1 teaspoon (5g) baking powder
1/2 teaspoon (3g) salt
1/2 cup (110g) packed light brown sugar
1/3 (75g) cup granulated sugar
4 large eggs
1/2 teaspoon pure vanilla extract

1. Preheat the oven to 325°F/160°C and put a rack in the center. Butter and flour a 9”x9” (23cmx23cm) square pan.
2. Place the butter in a 10” (25cm) skillet over medium heat. Brown the butter until the milk solids are a dark chocolate brown and the butter smells nutty. (Don’t take your eyes off the butter in case it burns.) Pour into a shallow bowl and chill in the freezer until just congealed, 15-30 minutes. 
It will first start to bubble, once it rises like boiled milk, turn off the heat immediately
as you might not see the browning until the froth disappears.

3. Whisk together cake flour, baking powder, and salt.
4. Beat the brown butter, light brown sugar, and granulated sugar in an electric mixer until light and fluffy, about 2 minutes. Beat in the eggs one at a time, mixing well, and then the vanilla extract.
5. Stir in the flour mixture at low speed until just combined.
6. Scrape the batter into the greased and floured 9”x9” (23cmx23cm) square pan. Smooth the top with a rubber spatula and rap the pan on the counter. Bake until golden brown on top and when a toothpick inserted into the center comes out clean, about 25 minutes.
7. Cool in the pan 10 minutes. Run a knife along the edge and invert right-side-up onto a cooling rack to cool completely.


Chocolate Glaze (For the Ice Cream Petit Fours)
9 ounces (250g) dark chocolate, finely chopped
1 cup (250 ml) heavy (approx 35% butterfat) cream
1 1/2 tablespoons (32g) light corn syrup, Golden syrup, or agave nectar
2 teaspoons (10ml) vanilla extract
Stir the heavy cream and light corn syrup in a small saucepan over medium heat until it comes to a boil. Remove from heat and add the dark chocolate. Let sit 30 seconds, then stir to completely melt the chocolate. Stir in the vanilla and let cool until tepid before glazing the petit fours.

Assembly Instructions – Ice Cream Petit Fours
1. Line a 9”x9” (23cmx23cm) pan with plastic wrap, so that no sides of the pan are exposed and so there is some extra plastic wrap hanging off the sides. Spread 1 ¾ to 2 cups (450ml to 500ml) ice cream into the pan. Cover with more plastic wrap and freeze several hours.
2. Once the brown butter pound cake has completely cooled, level the top with a cake leveler or a serrated knife. Then split the cake in half horizontally to form two thin layers.
3. Unwrap the frozen ice cream. Flip out onto one of the layers of cake and top with the second layer of cake. Wrap well in plastic wrap and return to the freezer overnight.
4. Make the chocolate glaze (see above.)
5. While the glaze cools, trim ¾” (2cm) off each side of the ice cream cake to leave a perfectly square 7.5” (19cm) ice cream cake. Cut the cake into twenty five petit fours, each 1.5”x1.5” (4cmx4cm).
6. Glaze the petit fours one at a time: place a petit four on a fork and spoon chocolate glaze over it.
7. Place the petit fours on a parchment-lined baking sheet and return to the freezer for one hour.


 This is my first pound cake, both eat and bake, so not sure if it is suppose to be crumbly and dry. I will definitely improvise with the brown butter which smells and tastes soooooo GOOD! But the pound cake is not to either mine or my mom's liking (dear hubby's kind enough to say it's good but I know he likes the soft sponge cake better). The Green tea icecream was not good, I guess it's cus..... I subbed this time 1 cup of cream with 1 cup of evaporated milk, will not EVER do this EVER again. Oh and the top I used white chocolate... as you experts will know... I over boiled it (did it over water but still too hot).

Monday, June 28, 2010

JUNE 2010 - Daring Baker's Challenge: Chocolate Pavlovas with Chocolate Mascarpone Mousse


The June 2010 Daring Bakers’ challenge was hosted by Dawn of Doable and Delicious. Dawn challenged the Daring Bakers’ to make Chocolate Pavlovas and Chocolate Mascarpone Mousse. The challenge recipe is based on a recipe from the book Chocolate Epiphany by Francois Payard.

 I just bought a beautiful copper bowl and never got the chance to try it out, so imagine the excitement I had when I saw that this month's challenge was pavlovas! ^-^ But after various reviews on the net, seems like copper bowl without any inner layer is not usable :(

Anyhow, I still love this challenge and I was thrilled to be able to finally try our homemade mascarpone, since I joined just a month after the tiramisu challange. If you look at the recipe you'll notice that the chocolate mascarpone mousse does not contain any sugar, well fear not! It is in perfect proportion when every flavour of these various layers come together into a perfect heavenly delight (yes, lots of adjectives).


Chocolate Meringue (for the chocolate Pavlova):
3 large egg whites
½ cup plus 1 tbsp (110 grams) white granulated sugar
¼ cup (30 grams) confectioner’s (icing) sugar
1/3 cup (30 grams) cocoa powder

Directions:
  1. Place a rack in the center of the oven and preheat to 200º F (95º C) degrees. Line two baking sheets with silpat or parchment and set aside.
  2. Put the egg whites in a bowl and whip until soft peaks form. Increase speed to high and gradually add granulated sugar about 1 tbsp at a time until stiff peaks form. (The whites should be firm but moist.)
  3. Sift the confectioner’s sugar and cocoa powder over the egg whites and fold the dry ingredients into the white. (This looks like it will not happen. Fold gently and it will eventually come together.)
  4. Fill a pastry bag with the meringue. Pipe the meringue into whatever shapes you desire. Alternatively, you could just free form your shapes and level them a bit with the back of a spoon. (Class made rounds, hearts, diamonds and an attempt at a clover was made!)
  5. Bake for 2-3 hours until the meringues become dry and crisp. Cool and store in an airtight container for up to 3 days.
Mascarpone
474ml (approx. 500ml)/ 2 cups whipping (36 %) pasteurized (not ultra-pasteurized), preferably organic cream (between 25% to 36% cream will do)
1 tablespoon fresh lemon juice
Method:
1. Bring 1 inch of water to a boil in a wide skillet. Reduce the heat to medium-low so the water is barely simmering.
2. Pour the cream into a medium heat-resistant bowl, then place the bowl into the skillet. Heat the cream, stirring often, to 190 F. If you do not have a thermometer, wait until small bubbles keep trying to push up to the surface.
It will take about 15 minutes of delicate heating.
3. Add the lemon juice and continue heating the mixture, stirring gently, until the cream curdles. Do not expect the same action as you see during ricotta cheese making. All that the whipping cream will do is become thicker, like a well-done crème anglaise. It will cover a back of your wooden spoon thickly. You will see just a few clear whey streaks when you stir.
3. Remove the bowl from the water and let cool for about 20 minutes.
4. Line a sieve with four layers of dampened cheesecloth and set it over a bowl.
5. Transfer the mixture into the lined sieve. Do not squeeze the cheese in the cheesecloth or press on its surface (be patient, it will firm up after refrigeration time).
6. Once cooled completely, cover with plastic wrap and refrigerate (in the sieve) overnight or up to 24 hours.
Vera’s notes: The first time I made mascarpone I had all doubts if it’d been cooked enough, because of its custard-like texture. Have no fear, it will firm up beautifully in the fridge, and will yet remain lusciously creamy.
Keep refrigerated and use within 3 to 4 days. 


Chocolate Mascarpone Mousse (for the top of the Pavlova base):
1 ½ cups (355 mls) heavy cream (cream with a milk fat content of between 36 and 40 percent)
grated zest of 1 average sized lemon
9 ounces (255 grams) 72% chocolate, chopped
1 2/3 cups (390 mls) mascarpone
pinch of nutmeg
2 tbsp (30 mls) Grand Marnier (or orange juice)

Directions:
  1. Put ½ cup (120 mls) of the heavy cream and the lemon zest in a saucepan over medium high heat. Once warm, add the chocolate and whisk until melted and smooth. Transfer the mixture to a bowl and let sit at room temperature until cool.
  2. Place the mascarpone, the remaining cup of cream and nutmeg in a bowl. Whip on low for a minute until the mascarpone is loose. Add the Grand Marnier and whip on medium speed until it holds soft peaks. (DO NOT OVERBEAT AS THE MASCARPONE WILL BREAK.)
  3. Mix about ¼ of the mascarpone mixture into the chocolate to lighten. Fold in the remaining mascarpone until well incorporated. Fill a pastry bag with the mousse. Again, you could just free form mousse on top of the pavlova.
Mascarpone Cream (for drizzling):
1 recipe crème anglaise
½ cup (120 mls) mascarpone
2 tbsp (30 mls) Sambucca (optional)
½ cup (120 mls) heavy cream

Directions:

  1. Prepare the crème anglaise. Slowly whisk in the mascarpone and the Sambucca and let the mixture cool. Put the cream in a bowl and beat with electric mixer until very soft peaks are formed. Fold the cream into the mascarpone mixture.
Recipe 4: Crème Anglaise (a component of the Mascarpone Cream above):
1 cup (235 mls) whole milk
1 cup (235 mls) heavy cream
1 vanilla bean, split or 1 tsp pure vanilla extract
6 large egg yolks
6 tbsp (75 grams) sugar
Directions:
  1. In a bowl, whisk together the egg yolks and sugar until the mixture turns pale yellow.
  2. Combine the milk, cream and vanilla in a saucepan over medium high heat, bringing the mixture to a boil. Take off the heat.
  3. Pour about ½ cup of the hot liquid into the yolk mixture, whisking constantly to keep from making scrambled eggs. Pour the yolk mixture into the pan with the remaining cream mixture and put the heat back on medium. Stir constantly with a wooden spoon until the mixture thickens enough to lightly coat the back of a wooden spoon. DO NOT OVERCOOK.
  4. Remove the mixture from the heat and strain it through a fine mesh sieve into a bowl. Cover and refrigerate until the mixture is thoroughly chilled, about 2 hours or overnight.
Assembly:
Pipe the mousse onto the pavlovas and drizzle with the mascarpone cream over the top. Dust with confectioner’s sugar and fresh fruit if desired, I drizzled some crunched walnuts.

This was not too difficult to make but sure had lots of steps and layers that had to be made individually. I don't have pastry bags therefore they don't look as... PRO as you could find in the daring kitchen's site.

Monday, June 7, 2010

Almond Semifreddo

Ingredient:
100g Almond Flake
150g Sugar
7 Large egg yolks
500ml Pure cream

Caramel:
150g Sugar
50ml Water

1.Put almond flake into a fry pan to fry until fragrance.
2.Prepare caramel
a. Combine water & sugar in a sauce pan with high heat
b. Keep “rotating” the sauce pan when brown colour start to coming out from the side of the sauce pan
c.Keep “rotating until the caramel becoming light yellow colour, then switch off the fire
d.Keep “rotating” until the whole pot becomes golden colour
3.Combine 1 into 2, stir thoroughly
4.Spread 3 thinly onto a baking paper for cool down (approx. 15mins)
5.Break 4 into small sizes (as desire)
6.Beat sugar and egg yolks into thick and light yellow colour mixture. (similar to mayo texture)
7.Beat the pure cream until stand
8.Combine 5 and 6
9.Fold 8 into 7
10.Place mixture into container, put into freezer for over night then serve.

So I found this recipe from CBC Bakery, it's one of the cake's that pure fattening with icecream like texture, something my dh would surely enjoy.

Will try this out asap sometime this week!

Thursday, May 27, 2010


The May 2010 Daring Bakers’ challenge was hosted by Cat of Little Miss Cupcake. Cat challenged everyone to make a piece montée, or croquembouche, based on recipes from Peter Kump’s Baking School in Manhattan and Nick Malgieri.


I have a huge craving for "puffs" (as how we call these in Taiwan) ever since I arrived at Chile, the only place that has them is Le Petit Patisserie on Av. Vitacura. Never thought I'll be making them myself but YEY for Daring Kitchen and Cat for giving me the "need" to try it. 

The original recipe can be found  here.

This recipe has three major components, the choux (puff), the crème patissiere (cream filling), and the glaze used for mounting or decoration. I followed the recipe of all three components as is, except that I made orange-vanilla cream cheese filling as I wanted to chill them and make a choux-cheese-cake montée.
 
Orange Vanilla Cream Cheese Filling
2 cup (225 ml.) whole milk
2 Tbsp. cornstarch
12 Tbsp. (100 g.) sugar
2 large egg
4 large egg yolks
4 Tbsp. (60 g.) unsalted butter
2 Tsp. Vanilla
1 stick of cream cheese (8oz or 225 g.)
1 Tbsp. Orange zest (I used orange zest wine I made last week)

1. Dissolve cornstarch in ¼ cup of milk.
2. Combine the remaining milk 3/4 with the sugar in a saucepan; bring to boil; remove from heat.
3. Beat the whole egg and cream cheese, then the yolks into the cornstarch mixture.
4. Pour 1/3 of boiling milk into the egg mixture, whisking constantly so that the eggs do not begin to cook.
5. Return the remaining milk to boil (add the orange zest now unless you have it in liquid form).
6. Pour in the entire hot egg mixture in a stream, continuing whisking.
7. Continue whisking (this is important – you do not want the eggs to solidify/cook) until the cream thickens and comes to a boil.
8. Remove from heat and beat in the butter, orange wine and vanilla. 
Do not refrigerate the chesse cream until it is filled in the choux.


Pate a Choux (Yield: about 28)
¾ cup (175 ml.) water
6 Tbsp. (85 g.) unsalted butter
¼ Tsp. salt
1 Tbsp. sugar
1 cup (125 g.) all-purpose flour
4 large eggs

Pre-heat oven to 425◦F/220◦C degrees. Line two baking sheets with parchment paper.

Preparing batter:
1. Combine water, butter, salt and sugar in a saucepan over medium heat. Bring to a boil and stir occasionally for 1 min.


2. Remove from heat and sift in the flour, stirring to combine completely.
3. Return to heat and cook, stirring constantly until the batter dries slightly and begins to pull away from the sides of the pan.


4. Add in an egg at a time, stirr until the egg is well absorbed and then add in the next egg. The dough should have a shinny appearance. Repeat until all 4 eggs are in.


Piping:
1. Transfer batter to a pastry bag fitted with a large open tip (I piped directly from the bag opening without a tip). 
2. Pipe choux about 1 inch-part in the baking sheets. Choux should be about 1 inch high about 1 inch wide.
3. Using a clean finger dipped in hot water, gently press down on any tips that have formed on the top of choux when piping. You want them to retain their ball shape, but be smoothly curved on top.
If you dont have  a pastry bag, as I didn't you may try to scoop it and then smooth the tips. 

option: Brush tops with egg wash (1 egg lightly beaten with pinch of salt).

Baking:
1. Bake the choux at 425◦F/220◦C degrees until well-puffed and turning lightly golden in color, about 10 minutes.
2. Lower the temperature to 350◦F/180◦C degrees and continue baking until well-colored and dry, about 20 minutes more. Remove to a rack and cool.

I baked them in 2 different sizes for better assembly.


Filling:
When you are ready to assemble your piece montée, using a plain pastry tip, pierce the bottom of each choux. Fill the choux with pastry cream using either the same tip or a star tip, and place on a paper-lined sheet. Filled choux can now be refrigerated for 1hr so that the cheese filling hardens.

And now you may decorate it with the Caramel Glaze, also it is used for sticking the choux together. I think the traditional way is to spin it around the final "cone" but since my husband is a kindda almost has diabetes so I try to cut low on sugar or use substitutes whenever possible.

Hard Caramel Glaze:
1 cup (225 g.) sugar
½ teaspoon lemon juice

Combine and cook until brown. Use immediately before it cools off and hardens.


And it tastes soooo good!!! The orange zing gave it the "light" and happy tone. I strongly suggest anyone who's not a huge fan of "milky cream taste" to try this.

I think I might even use the left over puffs and try something salty for tomorrow, perhaps smoked salmon with cream cheese (again?). LOL

Thursday, May 20, 2010

Orange-wine + Simple scones

昨天我家老公請了一天假 在家陪我,我們中午去買了halogen floor lamp 300Watts, I know, halogen is so 20 years ago, BUT, couldn't find a worthy replacement. And now, finally, some light in our living room! YEY~~

TODAY, very good mood! ^-^
把前天的Spinach salmon tarta 吃掉後 (damn! should've taken some picture of it, it was good... a layer of spinach+egg+cheese blend, a layer of smoke salmon and then another layer of the spinach blend), I've decided to bake some scones.


I've tried the "World's Best Scones! From Scotland to the Savoy to the U.S." and no, it was not the world's best scones at all, it was... okay... a bit on the dry side. So! today I am baking the "Simple Scones".


Ingredients

  • 2 cups all-purpose flour
  • 1/3 cup sugar
  • 1 teaspoon baking powder
  • 1/4 teaspoon baking soda
  • 1/2 teaspoon salt
  • 8 tablespoons unsalted butter, frozen
  • 1/2 cup raisins (or dried currants)
  • 1/2 cup sour cream
  • 1 large egg
Very simple indeed, mix all the dries together then finger blend in butter (they always recommend freezing it and then grate it, but I always just put it in the microwave for 30sec and it's superb soft). Slowly blend in the sourcream+egg mix. Voila! I doubled the recipe so:

This is ALOT better than the world's best! their main difference is that this one contains egg, and the other uses the egg as "brush on top" glaze and uses milk instead.

After baking these pretty scones, it's my daily orange time (我每天吃4~6顆 oranges/day). We buy those super large oranges with extremly thick skin. These oranges are no good for juicing but great for bitting. I have always wanted to do something with their zest (candied? too sweet...) So, after we bought this bottle of too sweet whitewine (not icewine, but too sweet still), I've decided to try something... pretty :P
Let's wait and see how it turns after a week! I guess I could always use it as cooking wine or for baking sweets, ^-^


這是從我家客廳看出去的景色,  一片厚重的雲covering the mountains a couple of days ago.
Oh, by the way, 昨天出門, we saw most of the mountains are covered by snow already! yeppy~